
Use an inbox you can access and retain control of. The screenshot shows the real Chinese signup form. No password, human verification or registration was submitted. Subsequent email-verification steps are documented guidance, not captured screens.
Visit dash.cloudflare.com/sign-up. Use the Email and Password fields beneath the Google, Apple and GitHub options. This guide follows email signup.
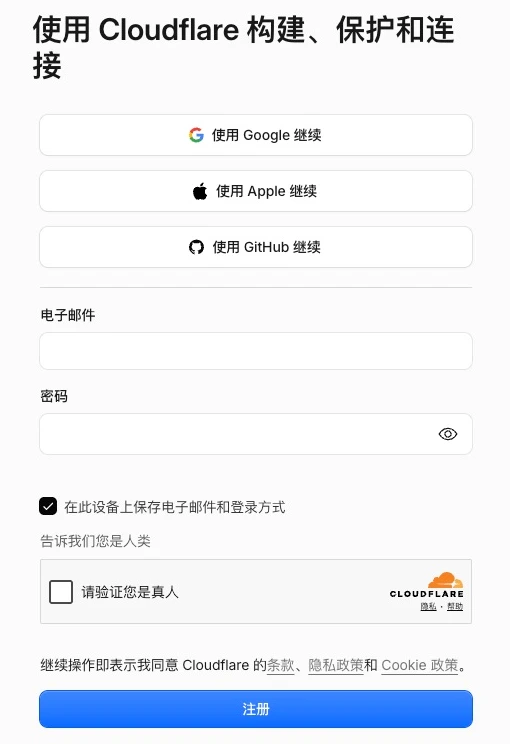
Enter the full address of an inbox you control, such as your existing Gmail. The account owner enters a password that meets the current on-screen requirements. Review the option to remember the email and login method on this device.
Complete any human-verification prompt yourself. Read the terms and privacy notices, then select Sign up only if you agree.
Open the inbox you registered with and find the Cloudflare verification email, including in Spam. Follow its verification link and sign in to Cloudflare when prompted.
In the dashboard, open My Profile and check that Email Address is marked verified. If necessary, use Send verification email and follow the new message.
FAQ and official references
Can I use Gmail?
Use an inbox that can receive the verification email. Email/password signup and Continue with Google are different login choices; remember the method you use.
Does signup include a domain?
No. Registering a domain is a separate process involving domain selection, contact details and payment.
Next, let’s work together.
Share this guide with a colleague or contact your RIFY project lead.
Contact RIFY ↗Read next: How to create a Gmail account →Read next: What to prepare before your project starts →Read next: How to buy a domain on Cloudflare →Read next: How to register a Shopify store →Read next: How to set up Google Search Console for your website →Read next: How to set up Google Analytics 4 (GA4) →Read next: How to grant RIFY GA4 administrator access →Read next: How to grant RIFY Search Console access →Read next: How to grant RIFY Shopify administrator access →